Super Crisp Font Anti-Aliasing In Photoshop With Sub-Pixel Hinting
Article Source: Click Here
Working with font in Adobe Photoshop can be incredibly frustrating at times, especially when working with small font using anti-aliasing. Creating consistent letterforms and crisp characters can be a bit troublesome given the default anti-aliasing options.
To catch some of you up, anti-aliasing is a technique for rendering smooth fonts. This is best illustrated with a simple example:
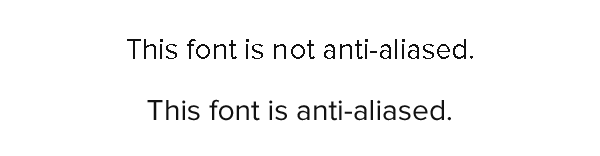
By adding semi-transparent pixels to a font, our type loses jagged edges found in aliased font, and create a more accurate representation of the actual letterform. Typically, anti-aliasing is handled by whatever program is displaying the font (ie: your browser and operating system determine how the font in this article is being displayed), but in Photoshop, the user determines how anti-aliasing is used.

The Problem
The problem for Photoshop users becomes this: When working with anti-aliased font in Photoshop, especially at small sizes, there simply aren’t enough pixels per character to render super crisp letterforms.
Physically speaking, there are not enough pixels. Since anti-aliasing will alter the opacity of pixels, smaller fonts sometimes won’t have enough room for both the 100% opaque pixels and the semi-transparent pixels. The result is blurry, fuzzy type.

In the example above, the “T” and “j” seem especially out of focus. There are very few 100% opaque pixels in several of the letters since there are not enough physical pixels to render into.
It may seem like your only option is to increase the font size so there are more pixels to use, but what if there was a way to actually add more physical pixels?
Adding More Physical Pixels With Sub-Pixels
Every pixel on your monitor is made up of 3 sub-pixels (some newer display technologies may actually have 4). Ignoring these 4-channel displays, every pixel on your monitor has a Red, Green, and Blue sub-pixel. You’re probably already very familiar with the concept that a pixel takes it’s overall color and brightness by combining the brightness of these 3 sub-pixels (and for some displays, such as plasma, the ability to completely turn off pixels for very deep blacks).
Smashing Magazine has explored this concept, and more regarding anti-aliasing in their post The Ails Of Typographic Anti-Aliasing.
Essentially, sub-pixel rendering allows us to use each sub-pixel of the monitor as a pixel in the letterform. The resulting character may have subtle color fringing, but also more desirable definition.
The difference is often subtle, but definitely perceivable. Unfortunately, there is no sub-pixel rendering anti-aliasing option in Adobe Photoshop.
Using Sub-Pixel Rendering In Photoshop
Photoshop smooths fonts by doing anti-aliasing in greyscale. We want photoshop to anti-alias font by blending different color channels though. To do this, we can manually create 3 separate text layers, each only showing a certain color channel (via advanced blending options), and then manually moving the layers barely to the right and left of each other. That’s awfully complex though.
Instead, Thomas Maier has created a Photoshop Action that will automatically do all of the work for you. The action takes your input type layer, duplicates it 3 times (while setting each layer to blend only a specific channel), and does all of the translating to simulate sub-pixel rendering.
To use the action, download it from Thomas’s website, and load it from Photoshop’s action window (Window → Actions). From the Actions tab, select “Load Actions” from the dropdown menu.

Load the Photoshop Action file that you downloaded from Thomas Maier’s website. Select the type layer you want to apply the action to. From the action tab, select the “subpixel-hinting” action, and click “Play selection“.
Some Notes
This technique is really most useful in creating concepts in Photoshop. When you’re working on a website layout in Photoshop, and want an accurate representation of what a font is going to look like in your content body, this action really will do a fantastic job displaying well defined type. Outside of conceptual design, there aren’t many applications for this.
Also, as Thomas notes, running this action will create 3 separate type layers. This means that whenever you want to edit type that’s been run through this action, you’ll have to edit that type 3 times. This can be simplified by duplicating the layer once, hiding one of the duplicate layers, and then running the action on the other. If you have to change something in the future, simply delete the 3 layers, make changes to the hidden layer, and run the action again.
Finally, if you want to learn more about antialiasing, sub-pixel rendering, and pixel hinting, you really should giveThe Ails of Typographic Anti-Aliasing a read.