iOS Design Guidelines
These guidelines describe how to design apps that follow the official HIG for iOS by Apple, not what you can do with custom controls. Sometimes it makes sense to break the rules. The purpose of this document is to guide you, not to provide solutions for complex and unique design problems.
BLINKDRINK transforms your phone from “that thing you play with when no one is talking to you at the bar” into a pint-sized party. Open the app, choose your color, and put your drink on top. BLINKDRINK uses the prism of your poison to keep time to whatever song is playing. You’re thinking, “iPhone as coaster? Sounds like a bad idea.” Well we put a lot of drinks on top of phones while making this thing- the only bad ideas generally happened afterward. Source
How much to make an App?
Estimate the cost of an app easily using this handy tool. http://howmuchtomakeanapp.com/
iFrame. We convert your presentation to the application for the iPad, and there is nothing extra: no buttons or select documents or receiving network indicator - only your presentation. We follow the rule: the simpler - the better. Simply, does not mean poorer: the iFrame-presentation can insert pictures, galleries, video and 3D-view. Easier, more convenient means. Source
5 Tips For Designing IPhone Apps In Photoshop
Article: Source
Designing a user interface for iPhone is totally different than designing for the web. Small screen, fixed width, users are on the move etc.
I’ve been designing a couple of iPhone apps recently and while doing so came across some useful techniques that I thought I would share for any designers who have still to move from web to iOS design. Good luck designing your mobile apps for iPhone!
1. Setup Photoshop
If you’re designing for iPhone 4 you’re designing for a high-res retina screen. 2 pixel lines appear as 1 point when they’re shown on screen.
Setup your Photoshop grid so the minimum grid lines are split in 2 pixels.
Photoshop > Preferences > Guides, Grid & Slices
I set the gridline to every 20 pixels, and subdivisions to every 2 pixels.

Now ensure you have snap setup to snap to all, ensuring any objects you move will snap to the 2px grid.
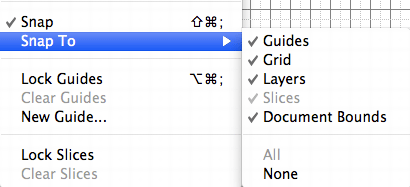
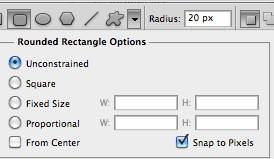
Also ensure your shapes tool is setup to snap to pixels. This should keep everything nice and sharp.
Colours look different on different screens so you may want to adjust your colour settings also.
There’s a good article by bjango on how to setup colour preferences for iPhone in Photoshop.
2. Have A PSD Template
If you’re a web designer you more than likely have a PSD template for designing a web site in Photoshop or a framework for marking it up in HTML/CSS.
Do the same for designing an iPhone app. Have the ‘static’ elements in place (e.g. status bar), a grid to work to and typical guide lines you might want to use (e.g. a guide line for the tab bar).
You may even want to have several elements to hand like buttons, text etc.
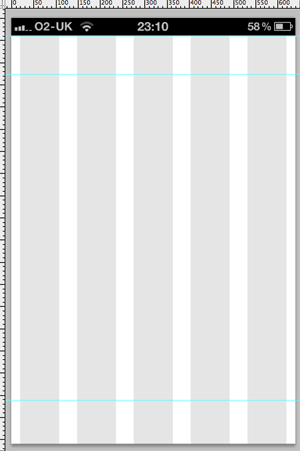
3. Download The IPhone 4 GUI PSD Retina Display
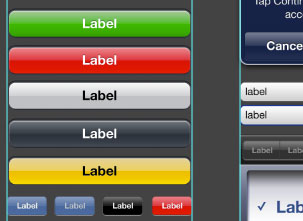
Save yourself some time and effort by using Teehan+Lax’s iPhone 4 GUI PSD retina display elements.
Even if you’re designing your own style of buttons, tab bars etc. these will come in very handy.
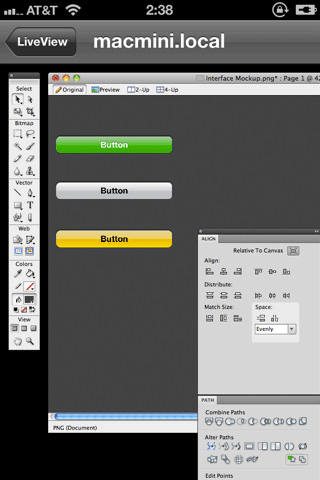
4. Use Liveview To Preview Your User Interface
It’s impossible to get a good idea of how an iPhone interface will actually look on an iPhone when you’re designing on a monitor.
Thanks to Nicholas Zambetti, there’s a free app to help you live preview your UI on iPhone.
- Window > Arrange > New window for [documentName]
- Move the new window to part of the screen you’re not using (a separate monitor works best)
- Open Liveview and place the ‘frame’ over that window in Photoshop.
- Now open Liveview on your iPhone, connect to your computer, and voila there is your app on your iPhone, giving you a live preview of how it looks.
5. Know The Apple IOS Human Interface Guidelines And Best Practices
Apple have documentation on designing interfaces for iOS that you must read if you’re designing any iOS app.
There are a lot of enforced guidelines in here along with best practices for mobile devices.
Examples:
- 44px is the ideal tappable area on screen
- Users expect iPhone apps to launch in portrait orientation
- Branding should be unobtrusive
- Each app submission requires several icon dimensions
- Controls should look tappable – make use of contours and gradients
- Modal windows/tasks interrupt so use sparingly
- etc.
- interactive
- interaction
- installation
- design
- led
- light
- art
- technology
- projectionmapping
- projectmapping
- robotics
- ui
- mobile
- projection
- interactivedesign
- lightdesign
- apple
- web
- 3d
- ux
- userinterface
- lightart
- robot
- artinstallation
- touchscreen
- application
- app
- webdesign
- touch
- motion
- responsive
- adobe
- multitouch
- future
- robots
- drone
- photoshop
- productdesign
- ledinstallation
- lightsculpture
- video
- user experience
- iphone
- creative
- interactivelight
- digitalart
- motiondesign
- ar
- 3dprinting
- responsivedesign
- augmentedreality
- drones
- kinetic
- data
- development
- kinect
- microsoft
- display
- immersive
- process
- painting
- timelapse
- dronerobotics
- 3dprojection
- ios
- vr
- virtualreality
- earth
- ai
- device
- user interface
- engineering
- laser
- lightpainting
- kineticsculpture
- lightinstallation
- touchinstallation
- animation
- programmableleds
- graffiti
- interactions
- neon
- performance
- leapmotion
- watch
- mobiledesign
- pixel
- environment
- exoskeleton
- interactiveenvironment
- sound
- lcd
- social
- leds
- lukew
- artlight
- patterns
- internet
- carui
- November 2011 128
- December 2011 65
- January 2012 25
- February 2012 27
- March 2012 33
- April 2012 31
- May 2012 16
- June 2012 32
- July 2012 20
- August 2012 37
- September 2012 24
- October 2012 34
- November 2012 31
- December 2012 6
- January 2013 21
- February 2013 11
- March 2013 10
- April 2013 35
- May 2013 45
- June 2013 10
- July 2013 49
- August 2013 33
- September 2013 40
- October 2013 57
- November 2013 31
- December 2013 28
- January 2014 86
- February 2014 49
- March 2014 24
- April 2014 40
- May 2014 6
- June 2014 9
- July 2014 1
- August 2014 34
- September 2014 30
- October 2014 45
- November 2014 21
- December 2014 6
- January 2015 5
- February 2015 17
- March 2015 18
- April 2015 14
- May 2015 1
- June 2015 10
- July 2015 4
- August 2015 1
- October 2015 11
- March 2016 4
- December 2016 18
- September 2017 6
- October 2017 13
- November 2017 5
- June 2018 8
- July 2018 2
- November 2018 7
- February 2019 8
- March 2019 6
- July 2019 1
- August 2019 1
- October 2019 1
- July 2020 5
- November 2020 9
- December 2020 1
- January 2021 1
- April 2021 1
- May 2021 9
- June 2021 3
- August 2022 3
- May 2023 2
- September 2023 1
- May 2025 6

