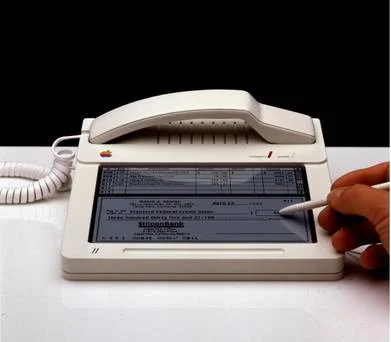
Original Apple iPhone 1983 - designer Hartmut Esslinger, the same guy who made the Apple IIc computer, came up with this phone/tablet prototype.
Chevrolet took over Hollywood Boulevard last week, re-creating a giant-sized, 3D version of the old-school claw game in front of the famous Roosevelt Hotel.
This short video explores our interactive film/art installation that used short film, Augmented Reality code technology, projectors, and smartphones and tablets to deliver an immersive, innovative, and interactive experience.
Photoshop Compositing Secrets: Extracting Hair
Article Source: Click Here
The following tutorial shows you step by step how to select a person with curves and troublesome hair (that is, troublesome for us—and maybe her stylist) so perfectly that we can blend her image indefinably into a different background.
Basic Hair Selection
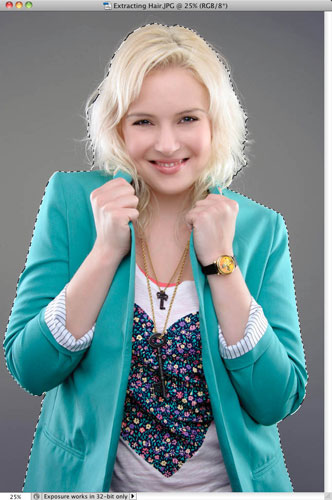
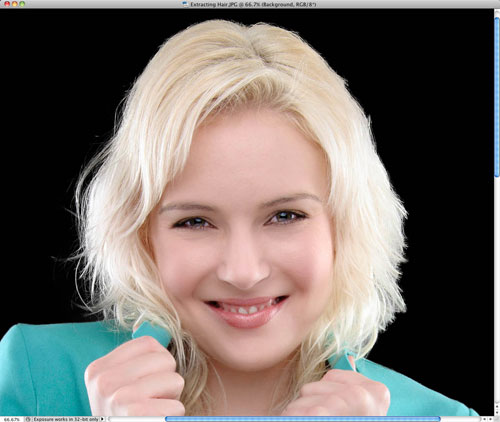
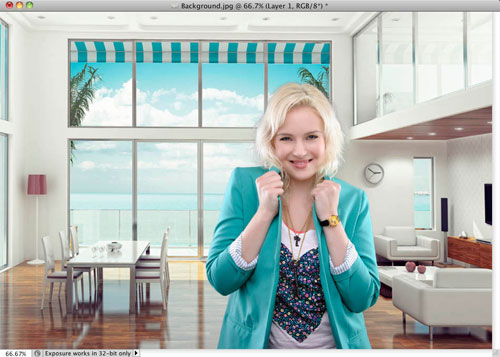
- Go ahead and open a photo of someone who has wispy hair. In Figure 1, the example I’m using shows an image with some cleanly defined edges around the woman’s clothing, but she definitely has some flyaway hair, too.

- Use the Quick Selection tool to put an overall selection around the person. Spend a minute or two to get the selection as close as possible around all of the well-defined edges, but don’t worry about the hair yet. Just get the overall selection to be very close, as you see in Figure 2. Don’t even try to select the hair edges at this point.
Refining the Edges
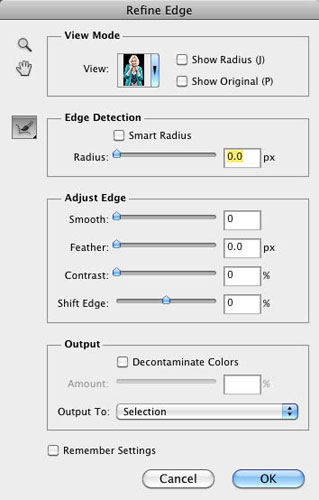
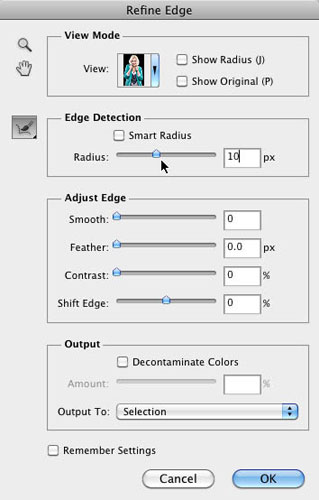
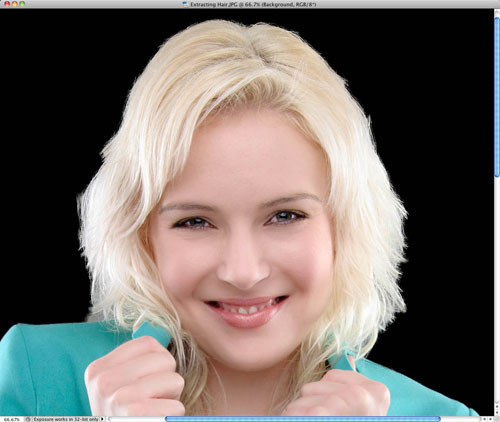
- When you’re ready to start working on the person’s hair, click the Refine Edge button in the options bar to open the Refine Edge dialog (see Figure 3a). Press F to cycle through the View settings to get to Black, since a black background shows off the light hair in this selection really well (see Figure 3b). If the person in your example has dark hair, try a white background instead.
- Turn on the Smart Radius checkbox and drag the radius slider to around 10, as shown in Figure 4a. You should immediately see a big improvement, as shown in Figure 4b. Seriously, folks, if you’ve ever doubted how powerful this Edge Detection stuff is, take a look at what it’s doing here. Press the P key to see your original and then press P again to see your current selection. All we’ve done so far is move one slider, and our selection is already starting to pick up more hair!
Refining the Radius
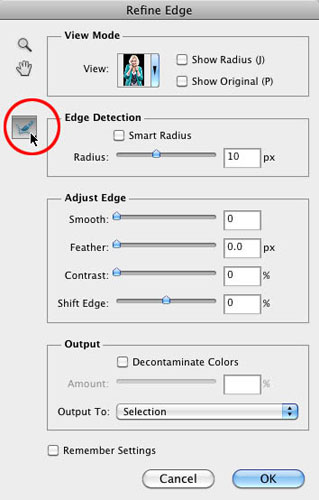
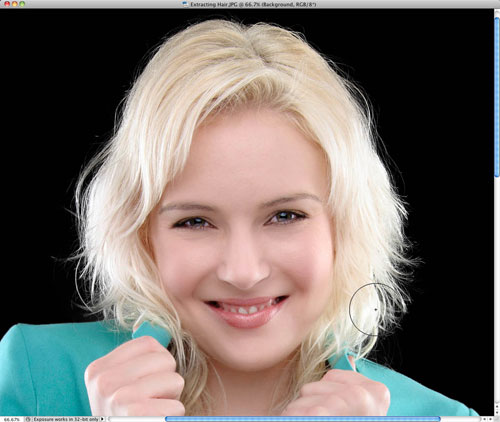
- Okay, we still have some work to do. In my example, we can definitely see the gray background behind the model peeking through around the edges of her hair, especially near her shoulders. And the hair is still way jagged. This is where we call in the ringer. The big dog. The head honcho. (Okay, I’ll stop.) The Big Kahuna here (sorry, last one) is the Refine Radius tool. It’s the little brush icon (circled in Figure 5) just below the Zoom and Hand tools at top left in the dialog.
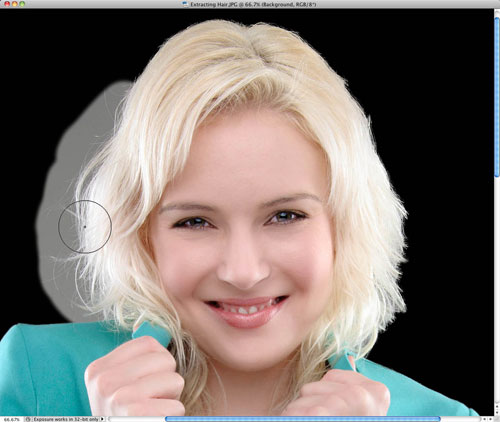
- Just like other brushes in Photoshop, the Refine Radius tool has a size setting that can be controlled with the left bracket ([) and right bracket (]) keys on your keyboard. Resize the brush to cover the entire radius of any flyaway hair; then simply start painting around the edges of the hair. As you paint, you’ll reveal part of the original background, so you can see just how far out you’ll have to paint to get all of the hair (see Figure 6a). When you release the mouse button, sit back in awe as Photoshop selects the hair but leaves out the background (see Figure 6b). Sometimes Photoshop needs a few seconds to catch up, so be patient when using this tool. I know, I sound like a total Refine Edge fanboy—but you have to admit that this tool rocks!
- Continue brushing around the edges of the hair to bring all of the wispy hair edges back (see Figure 7). You can paint in one long brush stroke around the entire head, or use smaller strokes in more concentrated areas. Honestly, I’ve tried both techniques, and I haven’t noticed better (or worse) results from either method.
Ready to Mask?
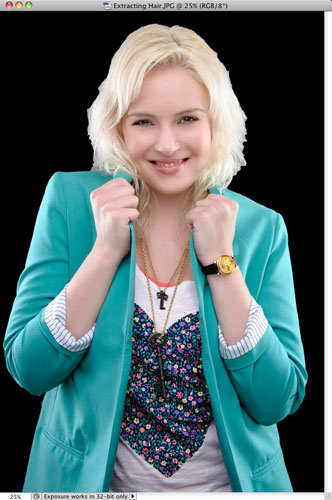
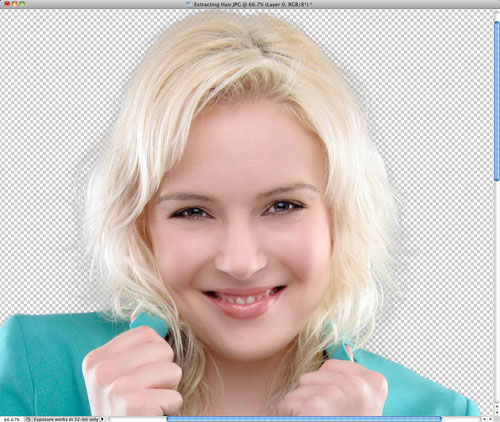
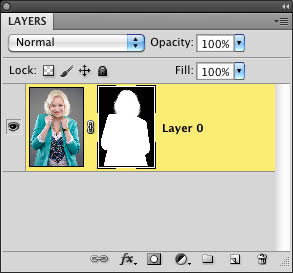
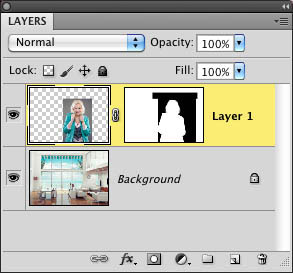
- The selection is looking good now. Choose Layer Mask for the Output To setting, and click OK when you’re done (see Figure 8a). Now we have her selected from the background, on her own layer, with a layer mask attached to it. Since there’s already a mask there, you’ll just see a transparent background behind your model (see Figure 8b).
- Open a background image where you want to place the copied image. For my model, Jessica, I’m using a background that has a lot of bright natural light in it, since Jessica has light on both sides of her hair, and I think a bright background fits her best. With your background image open, switch back to the original photo and select the Move tool from the toolbox (just press V). Drag the photo to the new background and position it where you want it—for this example, I’m placing Jessica’s image (see Figure 9a) on the right side of the background (see Figure 9b).
At an interactive digital tabletop, spectators can furthermore examine individual parts of the greater network in more detail. The impressive volume of information resulting from this effort will then be presented in three dimensions within an illuminated 4x4meter cube at the Bauhaus University in Weimar.
A “Clock for Robots” is something from the coming robot-readable world. It acts as dynamic signage for computers. It is an object that signal both time and place to artificial eyes.
For 2011’s festive celebrations, Heineken has created what could possibly be the world’s most social Christmas tree. Send your friends a unique festive greeting at http://www.socialtree.sg and watch it come alive as a visual showcase on the actual tree at Clarke Quay from 17 — 26 December. At 11 metres tall with 48 LCD screens, it promises to be Singapore’s most spectacular festive landmark ever.
- interactive
- interaction
- installation
- design
- led
- light
- art
- technology
- projectionmapping
- projectmapping
- robotics
- ui
- mobile
- projection
- interactivedesign
- lightdesign
- apple
- web
- 3d
- ux
- userinterface
- lightart
- robot
- artinstallation
- touchscreen
- application
- app
- webdesign
- touch
- motion
- responsive
- adobe
- multitouch
- future
- robots
- drone
- photoshop
- productdesign
- ledinstallation
- lightsculpture
- video
- user experience
- iphone
- creative
- interactivelight
- digitalart
- motiondesign
- ar
- 3dprinting
- responsivedesign
- augmentedreality
- drones
- kinetic
- data
- development
- kinect
- microsoft
- display
- immersive
- process
- painting
- timelapse
- dronerobotics
- 3dprojection
- ios
- vr
- virtualreality
- earth
- ai
- device
- user interface
- engineering
- laser
- lightpainting
- kineticsculpture
- lightinstallation
- touchinstallation
- animation
- programmableleds
- graffiti
- interactions
- neon
- performance
- leapmotion
- watch
- mobiledesign
- pixel
- environment
- exoskeleton
- interactiveenvironment
- sound
- lcd
- social
- leds
- lukew
- artlight
- patterns
- internet
- carui
- November 2011 128
- December 2011 65
- January 2012 25
- February 2012 27
- March 2012 33
- April 2012 31
- May 2012 16
- June 2012 32
- July 2012 20
- August 2012 37
- September 2012 24
- October 2012 34
- November 2012 31
- December 2012 6
- January 2013 21
- February 2013 11
- March 2013 10
- April 2013 35
- May 2013 45
- June 2013 10
- July 2013 49
- August 2013 33
- September 2013 40
- October 2013 57
- November 2013 31
- December 2013 28
- January 2014 86
- February 2014 49
- March 2014 24
- April 2014 40
- May 2014 6
- June 2014 9
- July 2014 1
- August 2014 34
- September 2014 30
- October 2014 45
- November 2014 21
- December 2014 6
- January 2015 5
- February 2015 17
- March 2015 18
- April 2015 14
- May 2015 1
- June 2015 10
- July 2015 4
- August 2015 1
- October 2015 11
- March 2016 4
- December 2016 18
- September 2017 6
- October 2017 13
- November 2017 5
- June 2018 8
- July 2018 2
- November 2018 7
- February 2019 8
- March 2019 6
- July 2019 1
- August 2019 1
- October 2019 1
- July 2020 5
- November 2020 9
- December 2020 1
- January 2021 1
- April 2021 1
- May 2021 9
- June 2021 3
- August 2022 3
- May 2023 2
- September 2023 1
- May 2025 6